Dog beds are a must in every room so Lucy can snooze and lounge around wherever she wants. But it’s so hard to find a stylish dog bed cover that coordinates with my decor. I love the quality of the beds from places like LL Bean and Orvis (and we have bought from them before and still use them!). But their covers are a little more masculine and preppy than I’d like.
We’ve had this Orvis bean bag bed for years… I’m talking over a decade! A few months ago it got a little tiny hole in the cover, most likely from Lucy rearranging it to the perfect spot (it’s a process!), and over time that little hole got bigger and bigger. Finally, I decided to figure out how to make a DIY stylish dog bed cover for it since the insides were still in good condition.
This post contains affiliate links.

Most sewing projects begin at my favorite local fabric store, Loom. I go in looking for a button or ribbon, and I leave with yards of various fabrics and ideas for new projects! That’s exactly what happened this time. I had no intention of buying dog bed fabric that day, but they had this beautiful palm leaf print in a durable outdoor fabric and I couldn’t resist!
I always have sewing odds and ends at home, so when I went digging around I found cording to make piping, lime green leopard print cotton and a chunky silver zipper. They were all fun accents for the palm leaf print!
Just so you’re aware, this isn’t the easiest sewing project to do and you will need a sewing machine to make the process much faster. If you don’t have a machine already, I would recommend getting one. There’s a lot of things you can make for your dog on a sewing machine (like cute bandanas)!
The choices in sewing machines can be a little overwhelming, but you don’t need anything complicated. I like this one from Singer and this one from Brother. Those are both really great sewing brands.
Skill Level: IntermediateTime: About 3 hours
Supplies:
- Durable Fabric
- Accent fabric for piping
- Cotton Cording
- Heavy Duty zipper (like this one)
- Dog bed filling (reuse one or you can buy shredded memory foam as stuffing)

Step 1: Lay the old bed on the new fabric. Start by laying out the old bed over the new fabric. The new fabric should be folded in half so you have 2 layers. I used the old bed as my template.
Sidenote: You can see how big that tear got! But the bed did last over 10 years before that happened.

Step 2: Cut out your pattern. When you cut, leave 2-3 inches extra around the old bed. I wasn’t very exact about it since the bean bag filling will be pretty forgiving. However, if you’re nervous, just go around the whole bed with a ruler and mark 2.5 inches out with pins. Then cut along the pin lines.

Step 3: Make the piping for the seams. This was my first time making my own piping! I’ve had this cotton cording lying around for years, so I was excited to get a chance to use it. You only need a thin strip of the accent fabric to wrap around the cord.

Step 4: Sew the accent fabric around the cording. Hold the fabric snugly around the cord and just sew along as close to the cording as you can. You want the fabric around the cord to be nice and tight.

Step 5: Pin piping to bed fabric. Once you have enough cording sewn up, then comes the tricky task of pinning it around the entire edge of the main bed pieces. Make sure you have your 2 bed pieces with the good sides facing each other, then start pinning the piping around leaving 1/2 an inch of seam allowance.

Step 6: Snip along the rounded edges. You can see that I snipped around the excess fabric of the cording so that it would be able to shape to the circle of the bed. You want to cut snips like this every couple inches for the entire length. It will ensure that your edges aren’t lumpy.

Step 7: Leave an unsewn length for the zipper. You want to leave a gap in the piping that’s big enough for your zipper. There will be no piping where the zipper runs.
Step 8: Sew in your zipper. Most zippers come with instructions on the package of how to sew them into place. I don’t have a zipper foot for my sewing machine (I should probably order a new one!), but if you do, that will make life easier! Just follow the instructions and attach your zipper where you left a gap in the piping.

Step 9: Flip the bed right side out! The final step is to flip the material so it’s all right side out and replace the bean bag filling. Now, you have a complete stylish dog bed!

Tips for Making Your DIY Dog Bed Cover
In every sewing project, the prep is very important. Make sure you have enough of all our materials. Also, make sure that you’ve loaded enough thread on your bobbin so you don’t run out halfway through.
If you’re new to sewing, you might want to skip ironing in between every step. But trust me, it’s worth it! It’s a pain in the butt and the first thing I’d want to skimp on, but ironing after every seam is sewn will make the final product turn out nice and crisp.
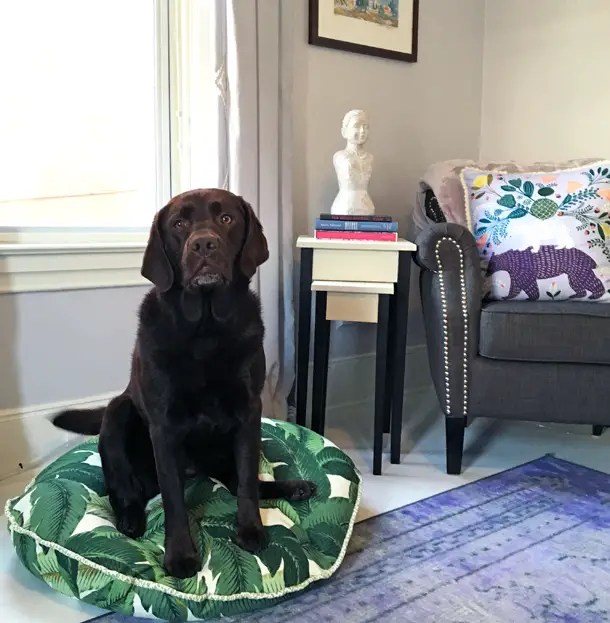
This is not just a dog bed, but now it’s a stylish addition to your home decor!
Did you like this project? Check out these other doggy DIYS:How to Make Reversible Dog BandanasDIY Flower Crown for DogsHow to Make Concrete Dog Bowl HoldersHow to Hand Wash Your Dog Collar the Right Way
Pin this!
This post contains affiliate links.